Here's my take on a very traditional, very delicious dish, Osso Bucco. I typically have a hard time finding veal shanks around here, so, I've adapted it to chicken.
Enjoy!
Friday, October 29, 2010
Recipe: Osso Bucco Inspired Chicken
Thursday, October 28, 2010
New Blog. Food Blog.
So Steph and I have started a new food blog, primarily revolving around our own culinary adventures, but which will also include reviews of restaurants and kitchen gadgetry. Instead of totally reposting things from there, I'll merely post links here.
Thus, post one in what I imagine will be a long series on bartending, to be found here.
Tuesday, October 26, 2010
Recipe: Oat Bread
Suppose one morning you wake up and decide to make oatmeal. Let's also assume that you use good old-fashioned, rolled oats. None of those instant or quick oats, please (we'll explain in a bit). Suppose, also, that you a lot left over...like say, 12 ounces of cooked oats. Now, what are you going to do with that? Save it for several more portions of oatmeal? That's a possibility. But let me suggest something different: oat bread.
Now, I will fully admit that Steph and I are true fans of Alton Brown - I would label myself in the "Briner" category...look that up, in case you're wondering. The recipe that follows is our first attempt at a recipe of AB's that recently aired, Oat Cuisine II. How was it? Read, and follow along on this particular culinary journey.
Recipe: Oat Bread
Ingredients:
12 ounces cook rolled oats
2 Tablespoons agave nectar
1 Tablespoon olive oil, plus extra for bowl and pan
1/4 cup warm water
11 ounces bread flour, plus extra for dusting
1 teaspoon salt
1 envelope dry active yeast
1/4 cup uncooked rolled oats, plus 1 tablespoon rolled oats, divided
1 egg yolk
1 Tablespoon water
Let's prep this dish as though we had every intention of cooking it from the start, as opposed to making due with leftover oatmeal (which, I will note, is equally viable...depending on what exactly you put into your oatmeal).
So, in a large bowl, you'll want to combine 11 ounces of bread flour (by weight, of course), a packet of dry active yeast, 1/4 cup of rolled oats, and 1 teaspoon of kosher salt, such as the following mixture:
This will be our dry team. Now, let's also prep our wet team. That'll be 2 tablespoons of agave nectar (this is a rather delectable, honey-like sweetener made from the agave plant [yes, the same plant true tequila is made from]. Where can you find it? Well, certainly any health food store, and almost every market in Chicago that I've seen has it somewhere, usually close to where they keep things like honey. It's as cheap as honey, so, if you're really penny pinching, why not buy a bottle of agave nectar instead of honey? Try it out. Or, you could substitute honey for the agave nectar in this recipe), 1 tablespoon of olive oil, and 1/4 cup of warm water:
Once you have that assembled, you're going to want to cook 12 ounces of rolled oats on the stove top, according to package directions. Why rolled oats? Well, they stand up a lot better to cooking and manipulation. See, instant and quick oats are chopped before they're rolled, creating thinner and thinner strips that really just fall apart when they're cooked...the texture is not great.
Anyway, you might want to try to have somewhere between 7 and 9 ounces of rolled oats, before you add water, to create 12 ounces of cooked oats (season with a pinch of kosher salt, of course!). It's likely you'll have leftovers, but hey...now you've got a bowl of oatmeal! Awesome!
So, our cooked oats:
And our leftovers:
So, measure out 12 ounces of the cooked oats, and add the wet team:
Stir together a bit, just to get everything coated, and then start slowly adding the dry team, in about three batches. Here's batch one:
Mix together with each addition, and you'll end up with a very, very sticky dough about like this:
When you've got that, take some bread flour and lightly flour a work surface. Turn the dough out onto the surface and knead for a full 10 minutes. A quick aside: one of the first times I ever made pasta by hand, I kind of skipped this step. It's not that I didn't knead it at all, I just kneaded it for a few minutes. I didn't understand all the stuff going on with the formation of gluten and other structural changes: I just thought this step was about incorporation of ingredients when they got too stiff to mix with a whisk or spoon. I thought it looked pretty well incorporated, so I went about the rest of the recipe and ended up with pasta that was just awful...it had no structure, and you couldn't do anything with it. So...the kneading is quite essential: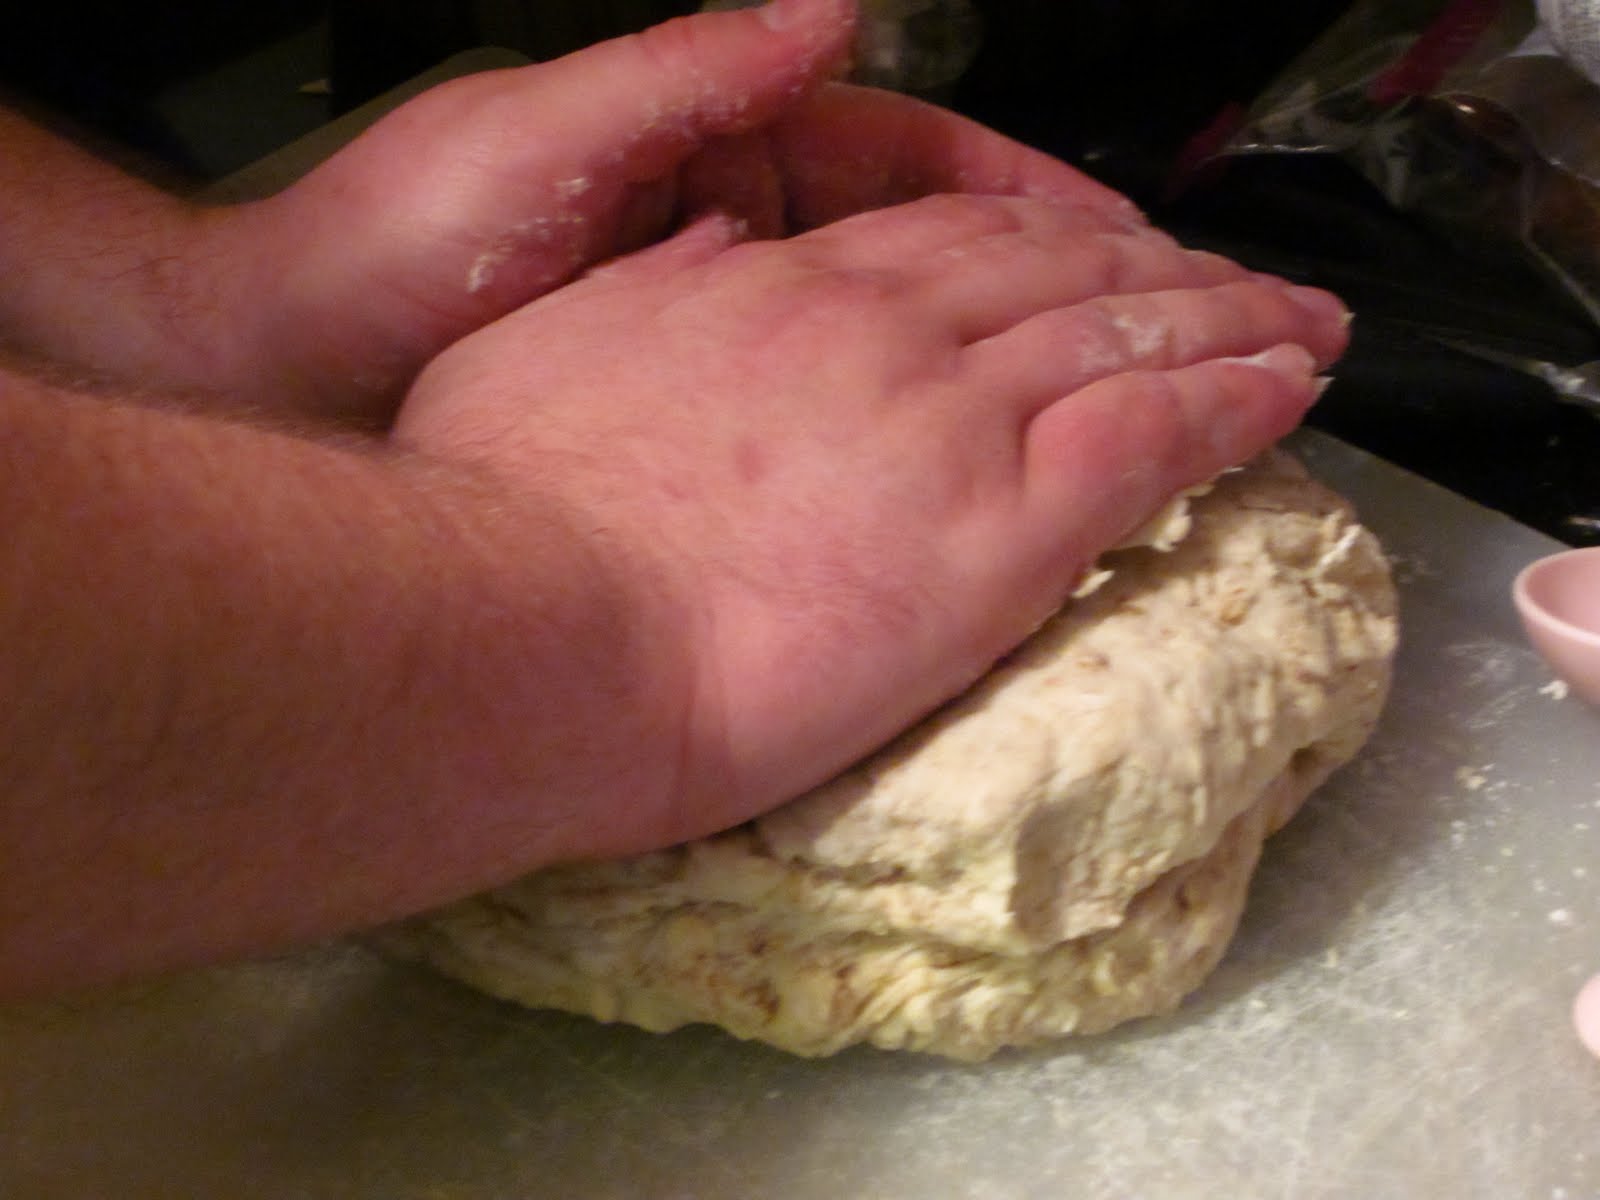
Once you've kneaded the dough, lightly oil a large canister or bowl and toss the dough in. Roll it around a bit to get a bit of a coating around the dough and then cover with a tea towel and let it sit in a dark, warm place for a full hour, or until it has doubled in volume. This will incorporate some good structure and development, which is always nice...as well as boosting a lot of flavor. You'll be able to smell a bit of the yeasty/bread smell if you get close to it. That's how you know it's working.
When the dough has risen, turn it out of the bowl/container and punch it down and then form it into a loaf and drop it into a lightly-oiled 9 inch by 5 inch loaf pan. Cover it with plastic wrap and put it in the fridge overnight, or full a full eight hours.
A note on this: a lot of bread recipes call for a short second rise at a regular temperature. This recipe, and one of the many reasons I love AB's recipes, calls for a long, slow rise in the fridge. I personally find that it creates a better overall texture and taste in the end.
After that eight hours/overnight period is over, you can take it out of the fridge, and you should be rewarded with something that looks roughly like this:
At this point, you'll want to prepare an egg wash. Take one egg yolk and one tablespoon of water. Mix that together well, and brush it along the top of the loaf. Take one more tablespoon of uncooked oats and sprinkle it along the top of the loaf, finally producing something like this:
Put that into a 350 degree oven for 55 minutes to an hour, or until the internal temperature of the loaf reaches 210 degrees. An instant read thermometer is hugely helpful for this. You should be rewarded with a loaf of bread looking basically like this:
You'll want to turn the loaf out onto a cooling rack and let it cool for at least 30 minutes before you slice into it. This will allow it to stabilize and cool enough to eat, which is always good. Why turn it out onto a wire rack? Well, it gets it away from the residual heat of the pan, and the bonus of a wire rack is that it allows even flow of air even under the loaf, instead of just across the top and sides. Anyway, after 30 minutes feel free to slice to your pleasure:
How does it taste? One word: Delectable. In another word: Scrumtrilescant. It's soft, with just a bit of a crunch. The oats on top provide a nice contrast of flavor, while the oatmeal in the dough itself very nicely dissolves and is imperceptible except for the wonderful taste.
The only real note I would make about this recipe is that you're going to want to make sure the oatmeal still has some moisture in it before you start mixing the flour in. I'm not saying you should make soupy oatmeal, or that it should be soaking, but I know I made the oatmeal a little dry and had to add a bit of warm water to the dough to get it to come together. Not too much, but a little bit. Otherwise, this one worked out perfectly. I highly recommend it!
Next up? Maybe some bar philosophy, and then perhaps getting into the quest for the perfect Long Island Iced Tea - definitely not my favorite drink, and rather bloated, I feel, but it's handy for a lot of other tips in bar-tending general.
Recipe: The "Marie" Sandwich
I figured I'd start adding some recipes and music to this blog, and to that end, I'd start with a rather simple sandwich, named for and inspired by a very close friend of ours who has left for the foggy British Isles. We call it the "Marie" Sandwich. It's a rather simple mix of avocado, tomatoes, and cheese, but it makes for an absolutely delicious sandwich, and can be greatly modified to suit the individual palate.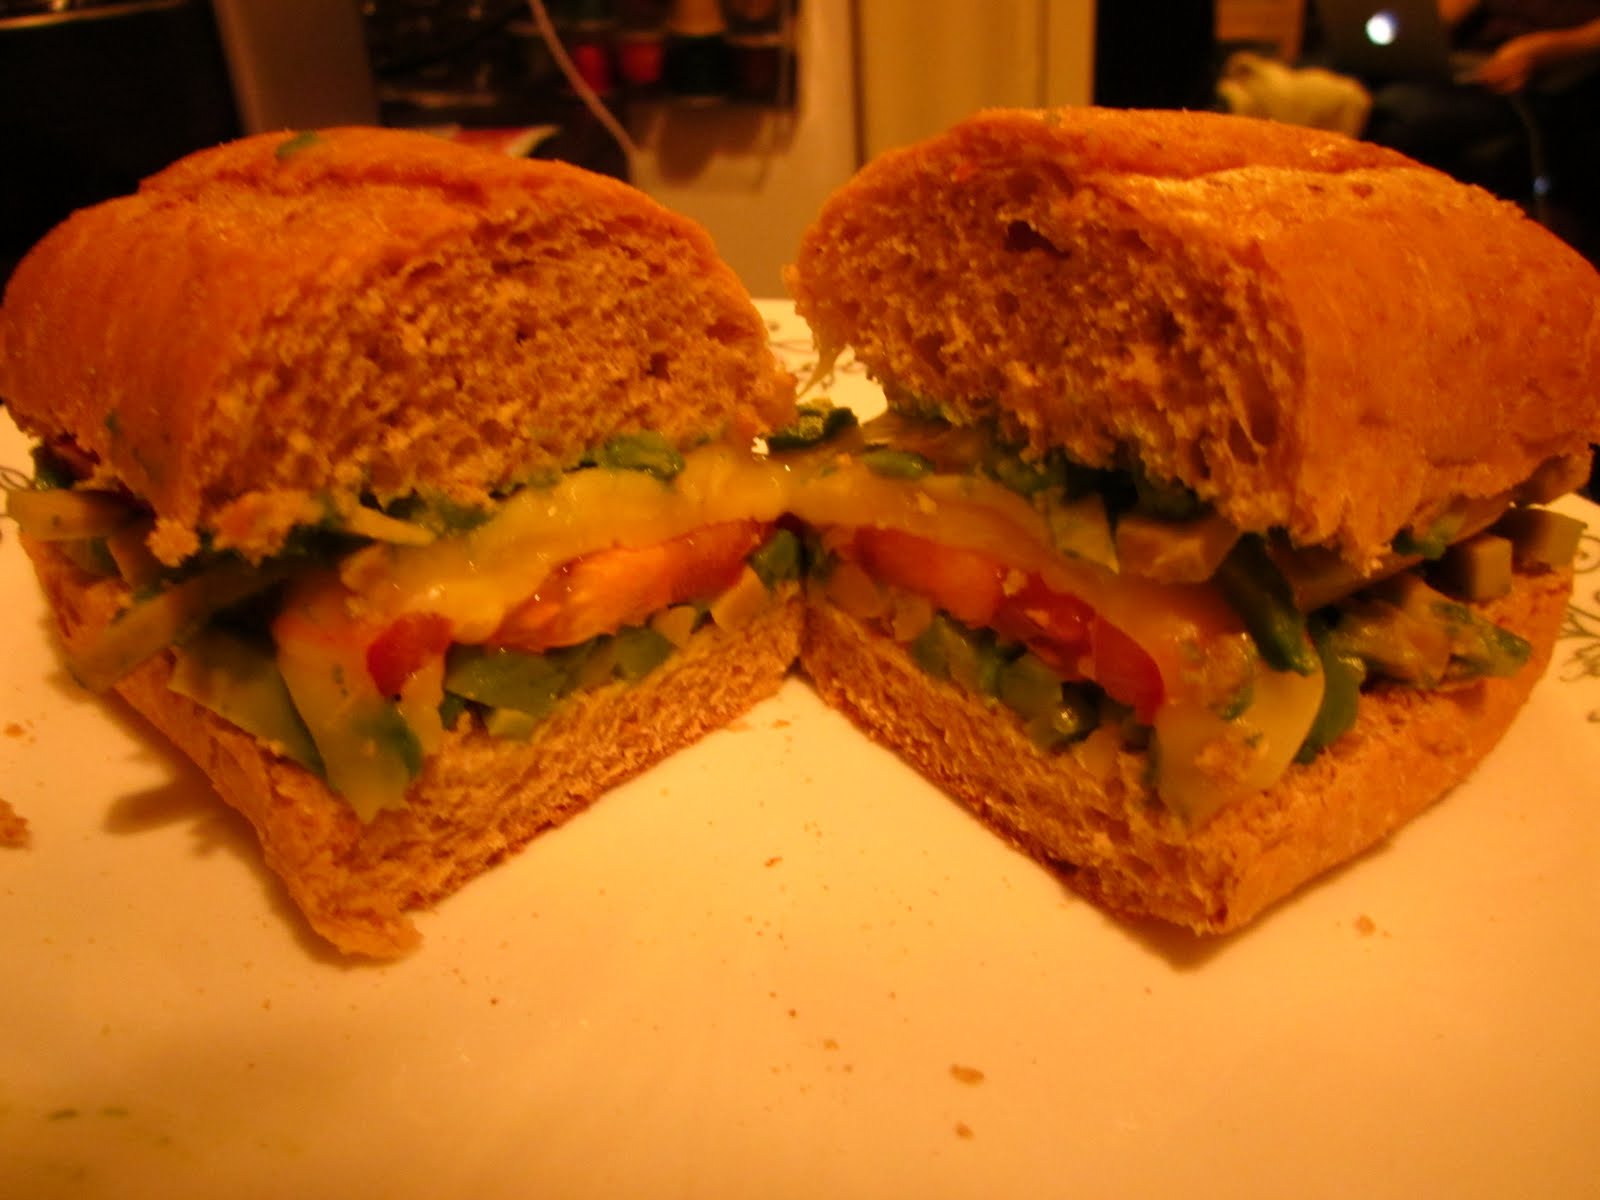
All of last year, Marie was a constant fixture at our house, and she was great for cleaning out the last of the leftovers we had in the fridge. We met Marie while she was directing the Dean's Men (a local theater group) production of Romeo and Juliet - Steph played the part of Tybalt and I mostly cooked for people and gave rides when they needed it. Steph and Marie became fast friends and started designing, and redesigning, all the costumes and props in the play. For a while, our apartment was overflowing with plaster and newspaper while we made face masks for the masquerade scene of the play. Through all of this, even though she was incredibly busy with classes and directly, Marie was always there for us and always willing to hang out.
So, during one of those marathon work sessions, Steph was working with Marie and her apartment, and Marie decided to make lunch - just simple sandwiches. Apparently, it was so good that Steph immediately called me to run to the store and pick up everything we'd need to make it ourselves.
By now, this has become a staple lunch-time or tide-me-over-till-dinner sandwich at our house. It's simple and quick to make, requires very few ingredients (unless you want to start modifying it...then you're only bound by the stability of the sandwich itself), and tastes great.
Recipe: "Marie Sandwich"
Ingredients:
1 half of a large, ripe avocado
1 medium, ripe tomato
2 slices Muenster cheese
1 sub bun
Directions:
Use a serrated bread knife to open the sub bun, splitting it into two pieces. Using a sharp knife, such as a chef's knife, carefully slice the avocado length-wise, cutting around the pit. Gently twist the halves apart and set aside the half without the pit. Cover your hand in a kitchen glove or with a towel and get a good grip on the avocado half with the pit. Using a sharp knife with a heavy blade, strike the blade down into the center of the pit, trying to use the part of the knife close to the handle. If the avocado is ripe enough, a gentle clockwise or counter-clockwise twist should free it.
Stretch your thumb and first finger around the spine of the blade and pinch/push the pit off of the edge. It should pop off easily. Then, you can carefully cut a small grid through the flesh of one half of the avocado and use a spoon to scoop it out and onto the bread. Try to evenly spread the avocado half onto each half of the loaf. If you can't mash the avocado easily, you may want to first put it into a bowl and mash it with a fork or potato masher. You can then cut the cheese slices in half and layer those on top of each half, and finally thinly slice the tomato and layer slices of tomato along one half.
Put the sandwich on a cookie sheet or other baking tray and put it under the broiler until the cheese has melted and the bread is lightly toasted. Remove from the oven, press the two halves together, and then let cool slightly before consuming.
Now, a quick note about sandwich making. There is much talk about "sandwich-physics," and it's important to figure out a few of the more important pointers there. Alton Brown, on the show Good Eats, goes into this in his season 8 episode "Sandwich Craft." In fact, I hear tell there are entire blogs and syndicated columns on the art of constructing the proper sandwich! I leave you to find those on your own, but I will reiterate Alton's rules from Sandwich Craft, because they are good reference, and they do have some bearing on this recipe:1) Soft ingredients (such as egg salad) go best with soft breads.
2) When using wet ingredients (e.g., tomatoes), always use a moisture barrier, such as mayonnaise, oil, butter, or cream cheese to prevent soaking. (note, this is also why when making a PB&J sandwich, it's best to coat both pieces of bread with peanut butter, instead of leaving the jelly exposed to naked bread on one side)
3) Do not place layers of slippery ingredients next to one another - this will cause everything to call apart as you're eating it - you have to think about the proper amount of friction to hold the sandwich together. And finally,
4) Never use a bread you wouldn't eat on its own. If it's not good enough for consumption plain, it's not good enough for sandwich-making.
Now, that being said, we should look back at our recipe and realize we might have a few potential issues. Most of them aren't serious and can be overcome with a little careful thought, but let's review and suggest a few possible modifications.
First of all - the sub bun or Hoagie roll. This works fine for us most of the time, but you may want to consider exactly how you're going to want the finished sandwich.
Consider, for instance, if you want an untoasted/unheated sandwich, you may want to get a roll with a rather crusty exterior, like say, a baguette, cut it in half, and dig out a bit of a trench in the bread (use the leftovers for breadcrumbs, or fondue, or dipping in soup!). You can fill that trench with the avocado and layer the tomato and cheese on top. If you wanted, you could create a simple vinaigrette by putting:
1/2 tsp. Dijon mustard into a mixing bowl and whisking with 1 Tablespoon of red wine vinegar and 1/2 tsp. kosher salt and several grinds of black pepper. Slowly drizzle in 3 Tablespoons of extra virgin olive oil while whisking constantly to create an emulsion.
You could slowly drizzle this mixture over the sandwich, place the two halves together, and then compress it in plastic wrap for a little while to let the flavors mingle.
But let's say you wanted a hot sandwich, maybe a pressed sandwich. In that case, you could almost completely slice the bread in two, add some mustard or olive oil, layer down the avocado, then the cheese, and the tomatoes in the middle, fold and crimp the cheese into the interior, and press the sandwich. This doesn't necessarily mean that you need a sandwich press. You could probably do it between two heated baking sheets, maybe with a hot cast iron pan on top. Leave it pressed for about ten minutes, and you'll have a pretty delicious sandwich.
As for additional toppings - spinach is a possibility, different cheeses can work, a little olive oil and vinegar, or a touch of salt and pepper...all of these can be added to personal taste - just keep in mind that you don't want to overpower the sandwich with two many competing flavors, and if you go too crazy with ingredients, it may not hold together.
Next up on the recipe list...I'm thinking oat bread.
Friday, October 22, 2010
House of the Rising Sun
Here's Joe and I doing a bit of House of the Rising Sun by the Animals. Obviously, my voice is going like crazy on this one. Forgive me.
Wild Horses
This is Joe and I practicing Wild Horses by the Rolling Stones. Obviously, I forgot some of the lyrics and some of the structure of the verses...it was late, we'd had a bit to drink, and I was a little distracted. I do appreciate Butter's laughter though.
Wagon Wheel practice
Here's Joe and I practicing a bit of Wagon Wheel by Old Crow Medicine Show, the night before the wedding. My voice was going all night, but, hey, gotta take the first step out there and take some criticism, no?
Subscribe to:
Posts (Atom)


